A
SMALL
CHEAP
AND EASY TO BUILD
CAPACITIVE DISTANCE- AND FORCE-SENSOR
WITH INTEGRATED SPRING-ELEMENT
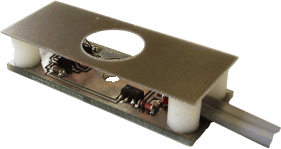
Fig. 1: Assembled sensor (without spring-element)
-
small: 50x20x10mm (without cable)
-
cheap: less than 3 Euro for parts (without board)
-
position measurement: +/- 1.5mm from zero-position
-
force measurement: dependent on spring stiffness
-
supply voltage: 9...28V DC, ca. 10mA (dependent on load)
-
frequency modulated output selectable with resistor
-
high resolution
Applications:
-
Bumper frame of a mobile robot
-
Collision detection of metal objects
-
"Invisible" switch behind a wallpaper
1) Principle of operation
This sensor measures the capacity between its top-electrode and a grounded
metal or any other high-conductive plate. This capacity C
depends on the distance between object and electrode d and
the size of the electrode A and calculates as follows:

When the resulting capacitor forms an RC-oscillator, the frequency f
is proportional to 1/RC, so the resulting frequency will be:

Which means that the frequency is proportional to the distance between
the sensor electrode and the object. The problem is, that any additive
parasite capacity will degrade the linearity of the sensor. But there are
many applications where a high linearity is not required or can be compensated.
2) Circuit
The circuit is quite simple. A Schmitt-trigger gate (IC3C), the sensor-capacity
(connected to pin SENSOR) and a resistor (R1) form an oscillator and generate
the output frequency. R1 can be used to determine the center-frequency.
Values between 10k and 1M can be used.
The generated signal is fed into the other five gates of the IC to
get enough output-current to drive a correct terminated signal-line. IC1,
D1 C1 and C2 generate a stable 5V supply from the input-voltage of 9 to
24V.
Attention: since HC-gates are used here, the edges of the output-signal
are very steep and a properly shielded and terminatied cable is essential
to get correct results and to avoid interferences. Fig.2 shows the schematic.
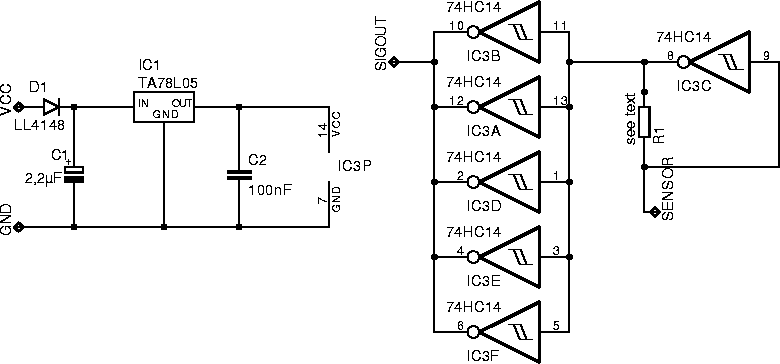
Fig. 2: Schematic
3) Board
The board can be built in many sizes. For my prototype, I chose a very
small size of 20x50mm. In the center of the board you can see a hole, that
carries the the spring element and - in case of a single sided board -
connects the ground of the circuit to the case when a screw is inserted.
As sensor electrode you will need another board of the same size and with
a hole in its center that has to be big enough that the spring elements
fits and has enough space to move. I use a thin (0.5mm) board with its
copper-side oriented towards the sensor, so I don't have problems when
the measured object accidently hits the sensor. This adds addition non-linearity,
but that's no problem in my application. The sensor-plate can be placed
on the sensor by using (plastic!) distance-rolls.
Fig. 3 shows the layout, fig. 4 the placement. Use the printable
version (original size when printed with 600dpi) or the Eagle
board-file and the Eagle schematic to construct
the board.
Fig 3: Layout
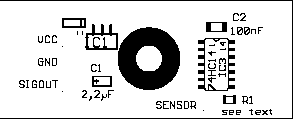
Fig. 4: Placement
4) Typical Application
A typical application may be the bumper-ring of a mobile robot. Two sensors
per edge can be placed under the bumper and in case of a collision, the
position of contact can be determined from the ratio of force on the two
sensors. Fig. 5 shows the assembly of such a configuration.
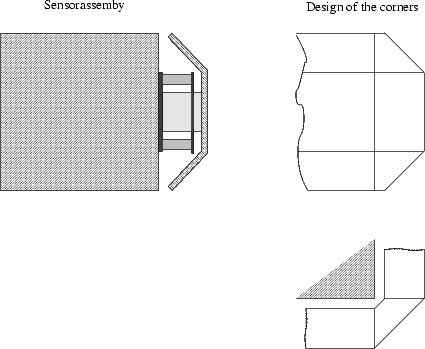
Fig. 5: Typical application
Have a lot of fun!
If you think: "Ees dis English?" and you are a native speaker, feel
free to send me a corrected version
of this page. :-)
Important note: These plans are provides without any warranty.
Use at your own risk!
last change 2001-09-09 Archi